Screen Protector Installation Instructions
• To help ensure installation success, we suggest reading the instructions in their entirety, once-over, before actual installation.
IMPORTANT: Dust particles left on screen prior to installation will cause bubbles. For that reason it is strongly advised to perform the installation in a low-dust environment. A bathroom with a frequented shower is an ideal location as steam reduces the dust in the air.
TIP: Working on a firm surface like a tabletop frees your hands and makes installation easier.
• Wash and dry your hands thoroughly. Use soap and water to remove dirt and oils.
1. Clean Your iPhone Screen
• Use the provided Micro-Fiber Cleaning Cloth to clean away dust, dirt and grime.
TIP: A bunched cloth cleans better than a flat cloth.
• Use the provided Dust Removal Tape to gently blot-out and remove any remaining dust particles, set tape aside for step 2.
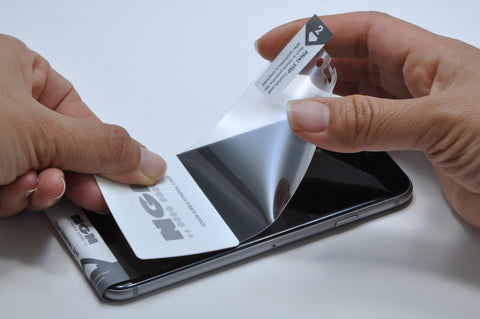
2. Align Screen Protector
• With both protective films still adhered, position the screen protector over your iPhone screen, with pull-tab #1 face down and pull-tab #2 face up. Move/Rotate the Screen Protector until cutouts align with screen.

• Once aligned, use a piece of Dust Removal Tape (from step 1) to secure the bottom of the screen protector to the bottom edge and backside of your iPhone. Position the tape so that approximately ¼ is sticking on the Screen Protector, and ¾ is sticking on the iPhone, secure firmly. This tape “hinge” will help lock the Screen Protector in place for the next step. Check to ensure the cutouts still align with the screen.
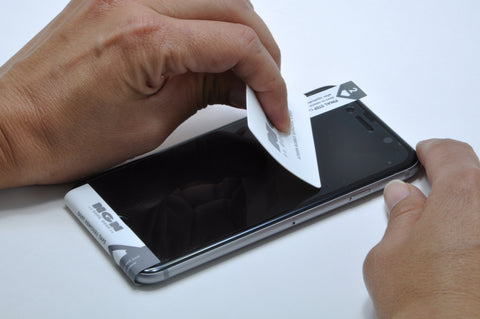
3. Apply Screen Protector
• With one hand swing the Screen Protector upwards by gently lifting on pull-tab #1 while ensuring the “hinge” remains in place and secure. With your other hand hold the Screen Protector by its edges.
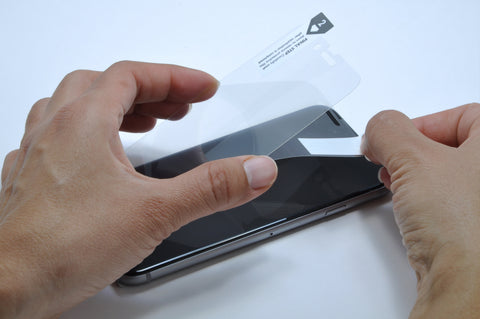
• Carefully peel pull-tab #1 downwards to remove the protective film and to expose the adhesive side. Do not allow the Screen Protector to contact the iPhone screen yet.
IMPORTANT: Do not touch adhesive side of the screen protector once film has been removed, handle by edges only.
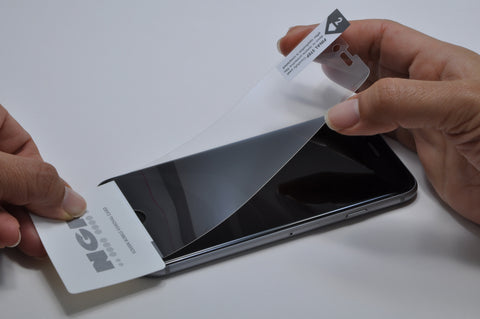
• Using the Screen Bubble Removal Card apply firm pressure on the bottom edge of the Screen Protector and “hinge” to adhere the bottom first. Slowly lower the Screen Protector onto the screen (bottom to top). Follow closely behind with the Screen Bubble Removal Card to smooth out the Screen Protector as it contacts and adheres to the screen.
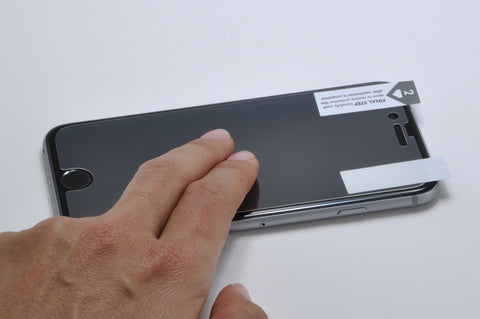
4. Smooth out Bubbles
• Use the Screen Bubble Removal Card to push any remaining bubbles out towards nearest edge. Use firm but not hard pressure.
TIP: Stubborn bubbles that don’t move are most often caused by specks of dust trapped between the Screen Protector and the iPhone screen. Please visit us at: www.enginedesigngroup.com/pages/support for tips on how to remove stubborn dust and bubbles.

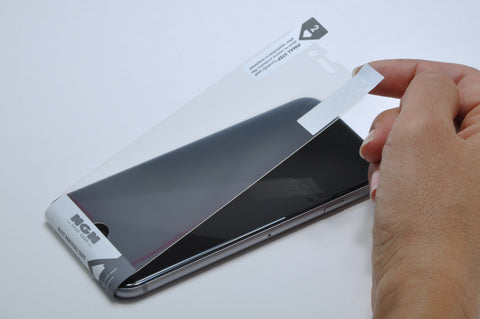
5. Remove 2nd Protective Film for Final Reveal
• Slowly and carefully peel pull-tab #2 in a lateral direction parallel to iPhone screen. Peel top to bottom until protective film and “hinge” are removed. Avoid pulling tab #2 upward as this may dislodge your newly installed Screen Protector.
TIP: Should you later need to use the Screen Bubble Removal Card to push out bubbles (after 2nd protective film has been removed) wrapping the Card with the Micro-Fiber Cloth will help prevent scratching.
• Use the Micro-Fiber Cleaning Cloth to polish the screen protector, and you’re done.